Friday, May 1, 2015

My Quilt Studio

My boyfriend and I just moved in together, yay!  So exciting!!!

We have a beautiful house in Glendale, CA that we are renting.  It's the absolute perfect place for us.  It has a beautiful yard with a pool that is perfect for entertaining.  

Here is the view from our patio:


There is a second bedroom big enough for his workout studio (he is a personal trainer, www.corekineticstrength.com in case you are interested. Shameless plug ;) ) and there is a nook off of the living room that was perfect for my sewing area.  It has windows, accordion doors that I can close for privacy, and a closet with built in storage.  Can it be any more perfect?!

The layout it great.  I have my sewing machine at the end on a desk. My cutting table in the middle with two cutting mats held in place by those rubber pads you put under your rugs so they don't slip. And then I usually set up the ironing board just inside the door frame so that I can turn around from the cutting table and iron.  It creates the triangle aspect that they recommend for increased efficiency and productivity.  


I made some "art" using fabric and embroidery hoops.  I made my white boards by purchasing pictures frames with glass and turned the picture it came with around to show the white side and then hot glued some iron embellishment to the frame.  


I wanted to make my tools more accessible while maintaining organization so I bought this rail and the buckets from Ikea and hung it on the wall by my cutting mats.  Small rulers are in the cage, scissors and rotary cutter are in the right bucket, pens and templates in the other buckets.


Ikea is an inexpensive way to create a space that is functional and cute.  The desk, cutting table and this storage unit are all Ikea.  I bought the colored boxes from Ikea as well to help keep my various projects organized and in one place. 


And some more decorations to add to the beauty of my room.  :)  Bigger rules are in my ruler shelf.  The picture frame says "Do one thing everyday that makes you happy".  My mom bought it for me awhile ago to remind me that I deserve to be happy too.  I love my little room and look forward to everything I am going to create in this wonderful space.


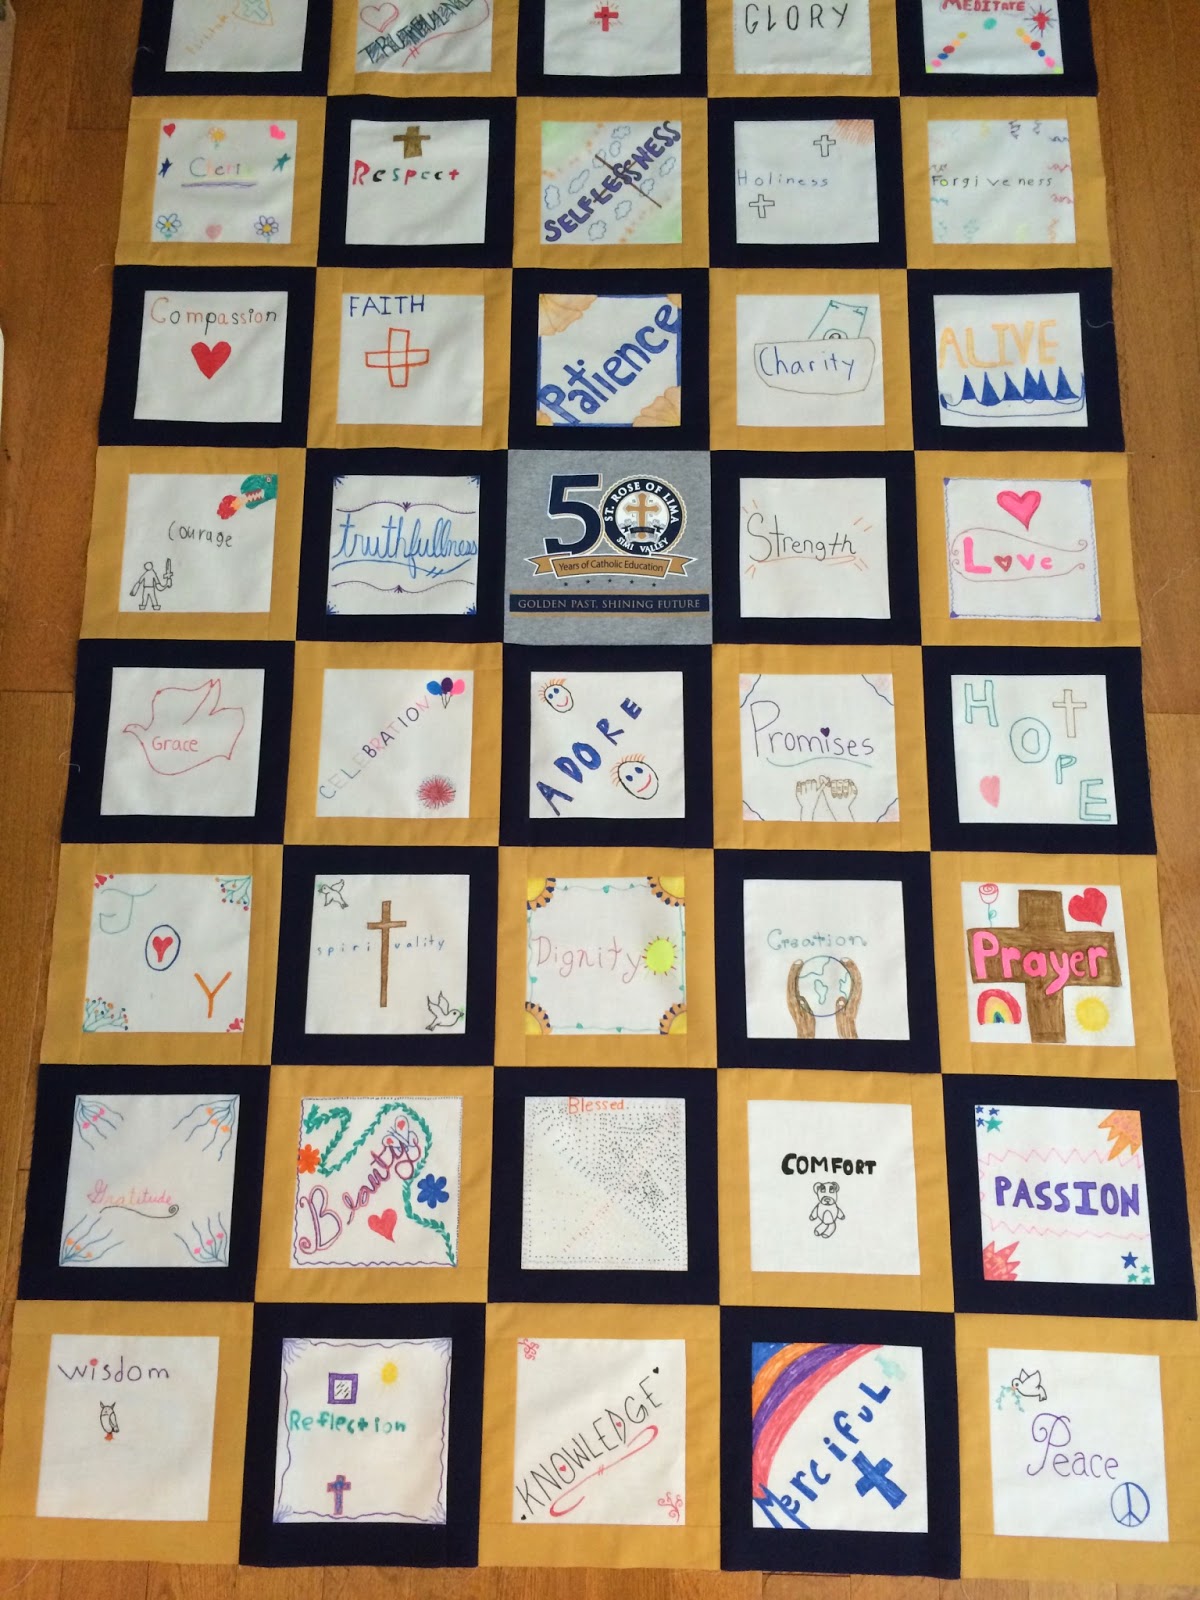
Auction quilt

The friend I gave the wedding guestbook quilt to had given my information to a friend of hers who loved the quilt I had made and wanted me to make one for her as well.  She contacted me and said she was looking for a quilt to be made for her granddaughters school that was having it's 50th anniversary and this quilt would be auctioned off at their anniversary event.  And she was going to pay me for it!  Eeek!!

I was so flattered that she loved the other quilt I had made and had specifically sought me out to make a quilt for her.  It was a bit overwhelming.  But I accepted because it sounded like a cool idea and I like making other people happy.  Who doesn't right?

She wanted squares that the kids in her granddaughters class could draw pictures on and then I would piece it all together.  The school is a catholic school so the kids would write something about what faith means to them or something.  She then wanted to incorporate catholic symbols of some kind into the quilt.  I got to work on designing the pattern and picking the colors. And since I'm not religious (meaning I don't go to church and only know the basics about religion), I had to do some research on the Saint for the school, St Rose of Lima, and other religious symbols that I could use.  It was a lot of work looking back on it now.  It wasn't just pick out the fabric and go, there was so much more to it than that.  I knew this quilt needed to be as meaningful as possible since it was for a 50th anniversary of a school.

I learned from doing the wedding quilt that giving the "artists" boundaries with which to write or draw in is important.  Since I was working with 4th graders I wanted to give them room to be creative but also create the boundary so the seam allowance was protected as was their art.  I went with white squares bordered with either blue or gold fabric, which are the school colors.


The squares ended up being 12x12.  When I got the squares back (40 total) from the kids and started to lay it out on my floor I realized the squares were too big so I ended up trimming the borders down so that the squares were 10x10 instead and it was more manageable.


For the religious symbols I chose to put them in the four corners of the quilt.  I used red roses for the Saint, a gold cross, white doves and a trinity symbol.  I used a T shirt from the school as a center piece for the quilt as well.


For the quilting I did straight lines through out the top with alternating blue and yellow thread.  On the border I used a gold sulky thread to go with the golden rose fabric I chose for the border.


This was such an amazing quilt to work on and a crazy experience.  I wanted it to be absolutely perfect for her and the school.   I have to learn to forgive myself for every little mistake that I see.  "Mistake that I see" is important to point out because we, the quilters, are our own worst critics and will know every thing we mess up on but we have to remember that just because we know its a mistake doesn't mean the general public will.  It was a learning experience beyond words and was incredibly gratifying.  


And I need to take some photography classes.  :p

Saturday, January 3, 2015

Cloudline Pinot Noir

Cloudline Pinot Noir is by far my favorite wine.  I first tasted it almost ten years ago when I was working for a restaurant as a bartender in downtown Los Angeles.   We sold it for $13.00 per glass.  One day after work the other bartender let me try it.  It was delicious!  Light and fruity.  So it became my favorite and I was on the hunt to purchase bottles for my home.  This was not easy at all!  The only store I could find it at was a Whole Foods in North Hollywood, CA for $24.00 per bottle (and the restaurant was selling it for $13.00 per glass!  Sheesh!).  But soon they stopped selling it and I couldn't find it anywhere.  Not even BevMo!  In fact, they had never even heard of it.

I was very disappointed and other than going to Willamette Valley, Oregon myself there was no way for me to get it.  But I never gave up.   Every time I went grocery shopping I would search the wine aisle for it only to come away empty handed.

Until one day a couple years ago I found it in a Vons in Simi Valley!  I literally said out loud "NO WAY!!!"  I bought three bottles that day just to have stock on hand.  Now I can buy it at my local Ralphs in Burbank so I am a happy girl.  I just hope they don't decided to stop selling it again.

I can't tell you what the bouquet is or anything about the tannins or whatever else real wine tasters can talk about.  I'm the kind of wine drinker that if it tastes good I drink it and that's it.

Friday, January 2, 2015

Sports Fan Quilt - Anaheim Ducks

My boyfriend is an Anaheim Ducks fan so for his birthday I made him a Ducks quilt.  I was walking through Joanne's one day and saw the Ducks fabric on sale and couldn't resist.  I did a simple Irish Chain quilt and made a lap quilt for him.  He loved it.

A unique gift for sure.  


My first T-Shirt Quilt - aka "The Beast"

I post pictures of my completed projects on Facebook to show my family and friends what I have been working on.  My cousin sent me a message through Facebook asking if I could make her a T-Shirt quilt for her boyfriend. She said he had a box full of old football T-shirts that were taking up too much room in the closet and she needed new shoes.  Well, I can certainly understand the need for more space for shoes so naturally I agreed to help a fellow shoe fan.  :)  

This was the first time I had ever done a T-shirt quilt so I did a lot of research on it to find out what I needed to do.  The key thing to any T-shirt quilt that I learned about: stabilizer, stabilizer, stabilizer.  Which was incredibly challenging to find!  I went to three different Joanne stores just to find exactly what I needed and still didn't find an exact match but got the next best thing.  My cousin sent the shirts to me and there were a ton of T-Shirts in the box, yikes!  A little intimidating for someone who hadn't done this type of quilt yet.  Only one shirt didn't make it in the quilt because it was a basketball shirt and not a football one so it didn't match the theme and was sent back in one piece.

Stabilizing a shirt takes a LONG time, especially with so many shirts to do.  The instructions for the stabilizer I bought said to press the iron into the shirt for 15 seconds.  It took me an entire day just to do the stabilizing for all the squares.


I sized all the shirts based on the logos which was difficult because some of the logos were smaller (about 12x12 inch squares) and the others were larger (15.5x15.5 inch squares).  Without a specific pattern to us it was daunting and I didn't know what to do with different size squares so to fix the problem I decided to add sashing and bordering to the smaller squares so that everything was a 15.5 inch square.


Since my cousins boyfriend is a fellow 49ers fan I decided to use 49ers fabric for the borders and backing with niners colors for the sashing on the smaller squares.


This thing turned out to be HUGE!  81 inches by 55.5 inches!  Because there was a lot going on in the squares already with the logos, I only quilted in the sashing and borders.  Turned out quite well if I do say so myself.   My cousin gave it to her boyfriend (who is now her fiancĂ©, yay!!!) on Christmas and he loved it!  Happy once again to provide someone with a great gift and bring a smile to their face.  After all, that's what quilters do, right?  Bring happiness and smiles to those we love.